← Back to Module 0: Languages & Platforms
Visual Studio Code Guide
Visual Studio Code (VS Code) is a free, powerful code editor that has become the most popular IDE in the world. It works with virtually any programming language and is my recommended editor for Python development.
Why VS Code?
If you're going to learn Python (Yay!), I recommend using VS Code for several reasons:
- Free and open-source — No cost, no licensing hassles
- Works with everything — Python, R, Stata syntax, Markdown, LaTeX, and more
- Excellent Python support — With the Python extension, it rivals dedicated Python IDEs
- Git integration — Version control built right in
- AI coding assistants — GitHub Copilot and Claude Code integrate seamlessly
- Huge extension ecosystem — Add functionality for any use case
Installing VS Code
- Download from code.visualstudio.com
- Run the installer (works on Windows, Mac, and Linux)
- Launch VS Code
The VS Code Interface
VS Code has a clean, customizable interface. The image below shows the main areas of the VS Code window. Hover over each numbered region to learn what it does:
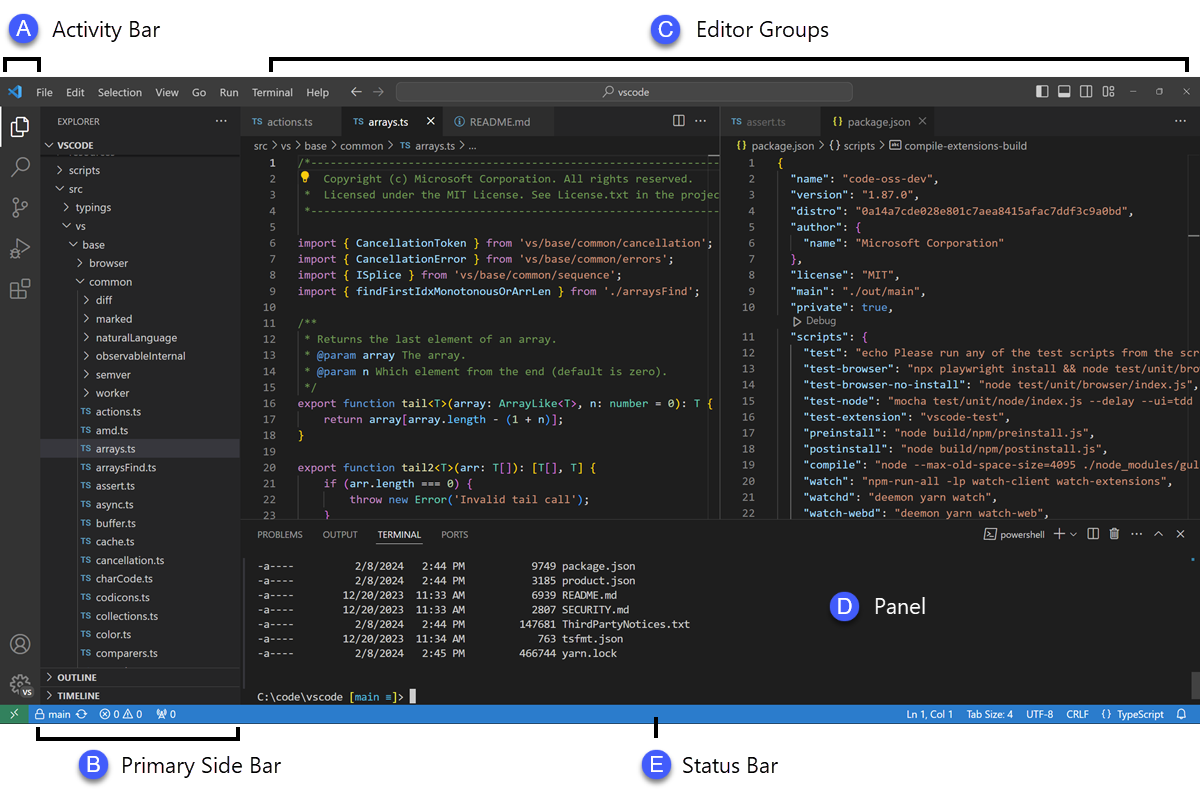
Hover over a numbered region to learn about that part of VS Code.
Image source: VS Code Documentation
Note: If you are not seeing the terminal window, you can open it by going to the top menu and selecting View > Terminal or by pressing Ctrl + `.
Installing Extensions
VS Code's power comes from extensions. Here's how to install them:
- Click the Extensions icon in the Activity Bar (or press
Ctrl+Shift+X) - Search for the extension name
- Click Install
Essential Extensions for This Course
Note: all names contain links to the extension pages with more details and descriptions.
| Extension | What it does | Required for |
|---|---|---|
| Python (by Microsoft) | Python language support, IntelliSense, debugging | Python development |
| Jupyter | Run Jupyter notebooks inside VS Code | Interactive Python |
| Pylance | Fast, feature-rich language support for Python | Better Python autocomplete |
| GitLens | Enhanced Git integration and history viewing | Version control |
At minimum, install the Python extension by Microsoft. It will automatically recommend Pylance as well. These two extensions transform VS Code into a powerful Python IDE.
Extensions for Other Languages
| Extension | What it does | Use case |
|---|---|---|
| Stata Enhanced | Syntax highlighting for Stata .do and .ado files | Reading/editing Stata code |
| stataRun | Run Stata code directly from VS Code (Mac only) | Execute Stata from VS Code |
| R (by REditorSupport) | R language support, syntax highlighting, code completion | Working with R scripts |
| LaTeX Workshop | Full LaTeX support: compiling, preview, autocomplete | Writing papers and documents |
AI Coding Assistants
AI assistants can dramatically speed up your coding by suggesting completions, explaining code, and helping debug errors. Here are the main options:
| Extension | What it does | Cost |
|---|---|---|
| GitHub Copilot | AI pair programmer that suggests code as you type | Free for students (via GitHub Education) |
| Claude Code | Chat with Claude AI directly in your editor | Requires Anthropic account |
| Codeium | Free AI code completion alternative | Free forever |
| Continue | Open-source AI assistant, works with various LLMs | Free (bring your own API key) |
While AI coding assistants are incredibly useful, I recommend learning to code without them first. Understanding the fundamentals will help you evaluate and debug AI-generated code. We'll cover AI-assisted coding in more depth in ProTools ER2.
Productivity & easy time interpreting code
| Extension | What it does |
|---|---|
| Markdown All in One | Shortcuts and preview for Markdown files (READMEs, notes) |
| Rainbow CSV | Colorize columns in CSV files for easier reading |
| Excel Viewer | View Excel and CSV files in a table format |
Python Virtual Environments
Virtual environments are one of the most important concepts in Python development. If you skip this section, you will run into problems eventually. Trust me on this one.
What is a Virtual Environment?
Imagine your computer is an apartment building. Python is the building itself, and packages (like pandas, numpy, matplotlib) are furniture. Now imagine every project you work on is a different apartment in that building.
Without virtual environments: Every apartment shares the same furniture. If Project A needs a red couch (pandas version 1.5) but Project B needs a blue couch (pandas version 2.0), you have a problem. You can only have one couch in the building.
With virtual environments: Each apartment has its own furniture. Project A's apartment has a red couch, Project B's apartment has a blue couch. They don't interfere with each other.
In technical terms, a virtual environment is an isolated Python installation with its own set of packages. When you activate a virtual environment, any packages you install go into that environment only, not your system-wide Python.
Why Do You Need Virtual Environments?
Here are the real-world problems that virtual environments solve:
| Problem | Without Virtual Environments | With Virtual Environments |
|---|---|---|
| Version conflicts | Project A breaks when you update pandas for Project B | Each project has its own pandas version |
| Reproducibility | "It works on my machine" but not your colleague's | Export exact package versions with requirements.txt |
| Clean uninstall | Packages scattered across your system | Delete the folder, everything's gone |
| System safety | Risk breaking system Python tools | System Python stays untouched |
I once spent two days debugging why a student's code wouldn't run. The problem? They had installed packages globally, and a system update had changed their Python version. All their packages were installed for Python 3.9, but the system was now running Python 3.11. A virtual environment would have prevented this entirely.
Creating a Virtual Environment
Python has a built-in tool called venv for creating virtual environments. Here's how to use it:
Step 1: Open Terminal in VS Code
Press Ctrl + ` (backtick) to open the integrated terminal.
Step 2: Navigate to Your Project Folder
# Example: navigate to your project
cd ~/Documents/protools_er1/my_project
Step 3: Create the Virtual Environment
# Create a virtual environment named 'venv'
python -m venv venv

# Or with a more descriptive name
python -m venv my_project_env# Create a virtual environment named 'venv'
python3 -m venv venv
# Or with a more descriptive name
python3 -m venv my_project_env
This creates a new folder (called venv or whatever name you chose) containing a complete Python installation.
Step 4: Activate the Virtual Environment
# Activate the environment
.\venv\Scripts\Activate.ps1

# If you get an execution policy error, run this first:
Set-ExecutionPolicy -ExecutionPolicy RemoteSigned -Scope CurrentUser# Activate the environment
venv\Scripts\activate.bat# Activate the environment
source venv/bin/activate
You'll know it worked when you see (venv) at the beginning of your terminal prompt:
Step 5: Install Packages
Now any packages you install will go into this virtual environment:
# Install packages (they go into the venv only)
pip install pandas numpy matplotlib statsmodels

# See what's installed in this environment
pip list
Step 6: Deactivate When Done
# Leave the virtual environment
deactivate
How to Check Which Environment You're In
There are several ways to verify your current Python environment:
# Method 1: Look at your prompt
# If you see (venv) at the start, you're in the venv

# Method 2: Check which Python is being used
which python     # Mac/Linux
where python     # Windows

# If it shows a path inside your project's venv folder, you're in the venv
# Example output: /Users/yourname/my_project/venv/bin/pythonimport sys
print(sys.executable)
# Shows the full path to the Python interpreter
# If it's inside your venv folder, you're in the venv
import sys
print(sys.prefix)
# Shows the base location of the Python installation# Look at the bottom-left of VS Code
# You'll see something like: Python 3.11.5 ('venv': venv)
# Or press Ctrl+Shift+P and type "Python: Select Interpreter"
# This shows all available environmentsWhere is the Virtual Environment Stored?
The virtual environment is simply a folder in your project directory. Here's what's inside:
├── venv/ ← The virtual environment folder
│ ├── bin/ (Mac/Linux) or Scripts/ (Windows)
│ │ ├── python ← The Python interpreter for this env
│ │ ├── pip ← Package installer for this env
│ │ └── activate ← Activation script
│ ├── lib/
│ │ └── python3.11/site-packages/ ← Installed packages live here
│ └── pyvenv.cfg ← Configuration file
├── my_script.py ← Your code
└── requirements.txt ← Package list for sharing
The venv folder can be hundreds of megabytes. Never commit it to Git. Instead, add it to your .gitignore file and share a requirements.txt instead. We'll cover this in Module 8: Git & GitHub.
Sharing Your Environment: requirements.txt
To share your project with others (or recreate it on a new computer), you save the list of installed packages:
# Save your current packages to a file
pip freeze > requirements.txt

# On a new computer, recreate the environment:
python -m venv venv
source venv/bin/activate  # or .\venv\Scripts\Activate.ps1 on Windows
pip install -r requirements.txt
The requirements.txt file looks like this:
numpy==1.25.2
matplotlib==3.7.2
statsmodels==0.14.0
VS Code and Virtual Environments
VS Code automatically detects virtual environments in your project. Here's how to ensure VS Code uses the right one:
- Open your project folder in VS Code
- Create and activate a virtual environment (as shown above)
- Press
Ctrl + Shift + Pand type Python: Select Interpreter - Choose the interpreter that shows
('venv': venv)or your environment name
From now on, VS Code will use this environment for:
- Running Python files (
F5orCtrl+F5) - Running code in the terminal
- IntelliSense and autocomplete
- Jupyter notebooks
Common Virtual Environment Issues
"python" command not found
On Mac/Linux, try python3 instead of python. On Windows, make sure Python is added to your PATH during installation, or reinstall Python and check the "Add Python to PATH" box.
PowerShell execution policy error (Windows)
Run this command in PowerShell as Administrator:
Set-ExecutionPolicy -ExecutionPolicy RemoteSigned -Scope CurrentUserVS Code doesn't detect my virtual environment
Make sure:
- The venv folder is inside your project folder (not somewhere else)
- You've opened the project folder in VS Code (not just a file)
- Try
Ctrl+Shift+P→ "Python: Select Interpreter" → "Enter interpreter path" and navigate to the Python executable inside your venv
Packages installed but "ModuleNotFoundError"
This usually means you installed packages in the wrong environment. Check:
- Is your terminal prompt showing
(venv)? - Is VS Code using the right interpreter? (Check bottom-left corner)
- Run
pip listto see what's installed in the current environment
Further Learning
- Python Virtual Environments Explained (YouTube, ~10 min) — Clear beginner-friendly explanation
- How to Use Virtual Environments in VS Code (YouTube, ~8 min) — VS Code-specific walkthrough
- Python venv Documentation — Official Python documentation
- Python Virtual Environments: A Primer — In-depth Real Python tutorial
- VS Code: Python Environments — Official VS Code documentation
Setting Up Your Project Folder
Before diving into data analysis, it's essential to organize your work properly. A well-structured project folder makes your research reproducible and helps you (and others) find files easily.
Recommended Folder Structure
For any research project, I recommend creating a folder structure like this:
├── data/ ← Raw data files (never modify these)
│ ├── raw/ ← Original downloaded data
│ └── processed/ ← Cleaned/transformed data
├── code/ ← Your Python scripts
│ ├── 01_import.py
│ ├── 02_clean.py
│ └── 03_analysis.py
├── notebooks/ ← Jupyter notebooks for exploration
├── output/ ← Figures, tables, results
│ ├── figures/
│ └── tables/
├── venv/ ← Virtual environment (don't commit to Git)
├── requirements.txt ← Package dependencies
└── README.md ← Description of your project
You can create this structure using VS Code's Explorer panel or by running these commands in the terminal:
# Create project folder structure (Windows PowerShell)
mkdir data\raw, data\processed, code, notebooks, output\figures, output\tables -Force# Create project folder structure (Mac/Linux)
mkdir -p data/raw data/processed code notebooks output/figures output/tablesimport os
from pathlib import Path
# Create project folder structure
folders = [
"data/raw",
"data/processed",
"code",
"notebooks",
"output/figures",
"output/tables"
]
for folder in folders:
Path(folder).mkdir(parents=True, exist_ok=True)
print(f"Created: {folder}")Opening Your Project in VS Code
Always open your project folder in VS Code, not individual files. This ensures:
- The Explorer panel shows all your project files
- The terminal opens in your project directory
- VS Code detects your virtual environment
- File paths work correctly
To open a folder: File → Open Folder (or Ctrl+K Ctrl+O)
Setting the Working Directory
In Python, the working directory is where Python looks for files when you use relative paths. Unlike R, Python doesn't have a simple setwd() function—instead, you use the os module.
To check your current working directory:
import os

# Where is Python looking for files?
print(os.getcwd())
To change your working directory:
import os

# Change to your project folder
os.chdir("C:/Users/yourname/Documents/my_project")

# Or use Path for cross-platform compatibility
from pathlib import Path
os.chdir(Path.home() / "Documents" / "my_project")The best practice is to open your project folder in VS Code (File → Open Folder). When you run Python from VS Code's terminal, the working directory will automatically be your project folder. No need to change it in code!
Practice: Download Real Data
Let's practice by downloading real economic data. Our World in Data provides excellent, well-documented datasets perfect for economics research. We'll use this data source throughout the course.
- Visit Our World in Data Datasets on GitHub
- Or download directly: GDP per capita (Maddison Project Database)
- Save the file to your
data/raw/folder
Alternatively, download it directly with Python:
import urllib.request
from pathlib import Path

# Download GDP per capita data from Our World in Data
url = "https://raw.githubusercontent.com/owid/owid-datasets/master/datasets/GDP%20per%20capita%20(Maddison%20Project%20Database%202020)/GDP%20per%20capita%20(Maddison%20Project%20Database%202020).csv"

# Create data/raw folder if it doesn't exist
Path("data/raw").mkdir(parents=True, exist_ok=True)

# Download and save
urllib.request.urlretrieve(url, "data/raw/gdp_per_capita.csv")
print("Downloaded successfully!")
Exploring Data in VS Code
Once you have data in your project, VS Code makes it easy to explore:
- Explorer Panel: Navigate to your
data/raw/folder and click on the CSV file - With the Rainbow CSV or Excel Viewer extension, you'll see formatted, color-coded columns
- Load and View: Use Python code to load and inspect the data:
import pandas as pd

# Load the data
gdp_data = pd.read_csv("data/raw/gdp_per_capita.csv")

# Quick look at the data
print(gdp_data.head())

# Basic info about the data
print(gdp_data.info())

# Summary statistics
print(gdp_data.describe())
For interactive data exploration, Jupyter notebooks are excellent. With the Jupyter extension installed, you can create .ipynb files in VS Code. Type a variable name on its own line and run the cell to see a nicely formatted table view of your DataFrame—no print() needed!
Essential Keyboard Shortcuts
| Shortcut (Windows/Linux) | Shortcut (Mac) | Action |
|---|---|---|
Ctrl + ` |
Cmd + ` |
Toggle integrated terminal |
Ctrl + Shift + P |
Cmd + Shift + P |
Command Palette (access everything) |
Ctrl + P |
Cmd + P |
Quick Open (find files fast) |
Ctrl + B |
Cmd + B |
Toggle sidebar |
Ctrl + / |
Cmd + / |
Comment/uncomment line |
Shift + Enter |
Shift + Enter |
Run selected Python code |
Video Tutorials
- Visual Studio Code Tutorial for Beginners (YouTube, ~30 min)
- Python in VS Code (YouTube, ~10 min)
- VS Code Intro Videos — Official video series from Microsoft