9 Git & GitHub
Learning Objectives
- Understand what Git is and why version control is essential for research
- Master key Git concepts: repositories, commits, branches, and remotes
- Create and configure a GitHub repository with the right settings
- Clone repositories and work with them in VS Code
- Understand the staging area and the commit workflow
- Push and pull changes to collaborate with others
- Avoid common beginner mistakes that cause frustration
Version control pairs perfectly with the reproducibility practices in Module 8. Together, they form the foundation of modern research workflows. If you have ever emailed yourself a file called analysis_final_v3_REAL.do, this module is for you.
9.1 What is Git and Why Use Version Control?
Git is a version control system - software that tracks changes to your files over time. Think of it as an extremely powerful "undo" button that remembers every version of every file you have ever saved.
The Problem Git Solves
As researchers, we have all been here:
analysis_v2.do
analysis_v2_fixed.do
analysis_v3_final.do
analysis_v3_final_REAL.do
analysis_v3_final_REAL_afterreview.do
analysis_v4_submitted.do
analysis_v4_submitted_revisions.do
analysis_v4_submitted_revisions_FINAL.do
// Which one did we send to the journal?
This approach has serious problems:
- No clear history: Which version fixed that bug? When did we change the regression specification?
- Collaboration chaos: When two people edit the same file, someone's work gets overwritten
- Disk clutter: Dozens of nearly-identical files taking up space
- Reproducibility nightmare: Which exact code produced the results in the paper?
Imagine a library where, instead of checking out books, you photocopied the entire book every time you wanted to read it. Then, when you wanted to make notes, you photocopied your copy again. Soon you would have hundreds of nearly-identical copies with no way to know which had your important annotations.
Git is like a magical library that keeps just one copy of each book, but remembers every change anyone has ever made - and can show you the book as it existed at any point in time.
What Git Does for You
🕑 Complete History
Git remembers every saved version of every file. You can see exactly what changed, when, and who made the change.
♺ Safe Experimentation
Try risky changes without fear. If something breaks, you can always go back to a working version.
👥 Collaboration
Multiple people can work on the same project simultaneously without overwriting each other's work.
🔍 Reproducibility
Tag the exact version of code that produced your published results. Reviewers can see precisely what ran.
Git vs. GitHub: What is the Difference?
This confuses many beginners, so let us be clear:
| Git | GitHub |
|---|---|
| Software that runs on your computer | A website that hosts Git repositories online |
| Tracks changes to files locally | Stores your repository in the cloud for sharing |
| Free, open-source tool | Company (owned by Microsoft) with free and paid tiers |
| Works offline | Requires internet connection |
| Command-line tool (primarily) | Web interface with extra features (issues, pull requests) |
Git is like an email program (Outlook, Mail app) - it is the software you use to write and organize emails.
GitHub is like Gmail or your email server - it is where your emails are stored online so others can access them.
You can use Git without GitHub (just like you can write emails without sending them), but GitHub makes it easy to share your work and collaborate with others.
Why Economists and Researchers Need Git
Version control is not just for software developers. Here is why it matters for empirical research:
- Journal requirements: Many journals now require replication packages with version-controlled code
- Collaboration: Work with coauthors without emailing files back and forth
- Pre-registration: Commit your analysis plan before seeing results to demonstrate credibility
- Error tracking: When a referee finds a bug, trace exactly when it was introduced
- Career: GitHub profiles increasingly serve as portfolios for academic and industry jobs
The American Economic Association's Data and Code Availability Policy requires all accepted papers to provide code that reproduces results. Git makes this straightforward: tag your code at submission, and the exact version is preserved forever.
9.2 Key Git Concepts
Before diving into commands, let us understand the core concepts. These terms will appear constantly, so it is worth taking time to understand them properly.
Repository (Repo)
A repository is a project folder that Git is tracking. It contains all your project files plus a hidden .git folder where Git stores the complete history.
A repository is like a filing cabinet for a single project. The cabinet (repo) holds all your documents (files), and it has a magical drawer (.git folder) that remembers every version of every document ever placed in the cabinet.
There are two types of repositories:
- Local repository: Lives on your computer. This is where you do your work.
- Remote repository: Lives on a server (like GitHub). This is for backup and collaboration.
Commit
A commit is a saved snapshot of your project at a specific moment. Each commit records:
- What files changed
- What the changes were (line by line)
- Who made the changes
- When the changes were made
- A message describing why the changes were made
A commit is like taking a photograph of your entire project. Just as you can flip through old photos to see how a room looked last year, you can flip through commits to see how your code looked at any point in time.
Each commit has a unique identifier (called a hash or SHA) - a long string like a1b2c3d4e5f6.... Usually you only need the first 7 characters to identify a commit uniquely.
Branch
A branch is an independent line of development. The default branch is typically called main (or master in older projects).
Imagine your project is a tree. The main branch is the trunk - the stable, primary version of your code. When you want to try something experimental, you create a new branch - like a tree branch growing off to the side.
You can work on your branch without affecting the trunk. If your experiment works, you merge the branch back into the trunk. If it fails, you can simply delete the branch - the trunk is unaffected.
Common branch usage:
main- The stable, production-ready versionfeature-new-regression- Adding a new analysisfix-data-cleaning- Fixing a bug in data processingexperiment-ml-approach- Trying a machine learning method
Remote
A remote is a connection to a repository stored somewhere else (usually on GitHub). The default remote is conventionally named origin.
When you push, you send your local commits to the remote. When you pull, you download commits from the remote to your local repository.
The Three States of Files
In Git, files exist in one of three states, which correspond to three areas:
| Area | What it contains | Analogy |
|---|---|---|
| Working Directory | Files as they currently exist on your computer - including unsaved changes | Your desk where you are actively working |
| Staging Area (Index) | Changes you have marked to be included in the next commit | A box where you place items to be filed |
| Repository (.git folder) | All committed snapshots - the permanent record | The filing cabinet with the complete archive |
The staging area gives you precise control over what goes into each commit. We explore this in detail in Section 9.6.
Quick Reference: Git Vocabulary
| Term | Definition |
|---|---|
| Repository (repo) | A project folder tracked by Git |
| Commit | A saved snapshot of your project |
| Branch | An independent line of development |
| Main/Master | The default, primary branch |
| Remote | A repository stored on a server (like GitHub) |
| Origin | The default name for your remote repository |
| Clone | Download a copy of a remote repository |
| Push | Upload local commits to the remote |
| Pull | Download remote commits to your local repo |
| Merge | Combine changes from different branches |
| Staging | Marking changes to be included in the next commit |
| HEAD | A pointer to the current commit you are viewing |
9.3 The Git Workflow Explained Simply
ALL Git commands in this module are run in a terminal (also called the command line, shell, or console) — not in the R console, not in a Python notebook, and not in a browser.
In VS Code: Open the built-in terminal with Ctrl+` (backtick) on Windows/Linux or Cmd+` on Mac. You can also go to View → Terminal, or use the menu Terminal → New Terminal. This terminal appears at the bottom of VS Code and works just like a standalone terminal. (See Module 0c: VS Code Guide for more details.)
Outside VS Code: On Mac, open the Terminal app (search for "Terminal" in Spotlight or find it in Applications → Utilities). On Windows, use Git Bash (installed with Git), PowerShell, or Command Prompt. On Linux, open your distribution's terminal emulator.
Before running any Git commands, make sure you cd into your project directory. For example: cd ~/Documents/my-research-project.
The basic Git workflow has just four steps that you will repeat over and over. Once you understand this pattern, Git becomes much less intimidating.
The Basic Workflow
Edit Files
Work on your project normally - write code, edit scripts, add data files. Git watches these files but does not automatically save changes.
Stage Changes
Tell Git which changes you want to include in your next snapshot. Think of this as putting files into a box marked "ready to save."
git add analysis.py          # Stage one file
git add .                    # Stage all changed files
Commit
Create a permanent snapshot with a message describing what you did. This saves the staged changes to your local repository.
git commit -m "Add regression with robust standard errors"git commit | The command to save a snapshot of staged changes |
-m | Short for message — lets you write the commit description inline, in quotes. Without -m, Git opens a text editor for you to type the message |
Push
Upload your commits to GitHub so they are backed up and available to collaborators.
git push origin maingit push | The command to upload commits to a remote server |
origin | The name of the remote (the default name given to the GitHub URL when you cloned) |
main | The branch you want to push to |
A Day in the Life
Here is what a typical Git workflow looks like during a research project:
In the code blocks below, the $ symbol at the start of each line represents the terminal prompt — it is the symbol your terminal displays to show it is ready for input. You do not type the $ yourself. For example, if you see $ git status, you only type git status and press Enter. The $ is just a convention used in documentation to distinguish commands from their output.
# Morning: Start work, get latest changes from collaborators
$ git pull origin main

# ... you work on the analysis for a few hours ...

# Check what you have changed
$ git status

# See the specific changes line-by-line
$ git diff

# Stage your changes
$ git add analysis.py utils.py

# Commit with a meaningful message
$ git commit -m "Fix data cleaning bug and add summary statistics"

# End of day: Push to GitHub for backup
$ git push origin mainThe Status Check Habit
Get into the habit of running git status frequently. It tells you:
- Which branch you are on
- Whether you are ahead or behind the remote
- Which files have been modified
- Which files are staged for commit
- Which files are untracked (new files Git does not know about)
When in doubt, run git status. It will never change anything - it just shows you the current state of your repository. Many beginners skip this and get confused about what Git is doing.
9.4 Creating a GitHub Repository (Step-by-Step)
Let us walk through creating a new repository on GitHub. I will explain each setting so you understand what you are choosing.
Prerequisites
- A GitHub account (free at github.com)
- Git installed on your computer (download here)
Checking if Git is Installed
Open your terminal (Terminal on Mac, Command Prompt or Git Bash on Windows) and type:
Remember: the $ at the start of command lines represents your terminal prompt — do not type it. Just type what comes after the $.
$ git --version
If you see a version number (like git version 2.42.0), Git is installed. If you get an error like "command not found," you need to install Git first.
On macOS, if Git is not installed, you will be prompted to install the Xcode Command Line Tools when you run git --version. Click "Install" when prompted - this installs Git along with other useful developer tools.
First-Time Git Setup
Before you can make commits, Git needs to know who you are. This information is attached to every commit you make. Run these commands once in your terminal (you only need to do this once per computer):
# Set your name (this appears in your commits)
$ git config --global user.name "Your Full Name"

# Set your email (use the same email as your GitHub account)
$ git config --global user.email "your.email@example.com"

# Verify your settings
$ git config --global --listFor the email, use the same address you registered with on GitHub. This ensures your commits are linked to your GitHub profile and show your contributions correctly. You can find or change your GitHub email at github.com/settings/emails.
Why --global? The --global flag saves settings in ~/.gitconfig (a file in your home directory) and applies to every Git repo on your computer. This is convenient because you only set it once. If you need a different name or email for a specific project (e.g., a work project vs. personal), run git config user.name "Work Name" (without --global) inside that repo — the local setting overrides the global one for that project only.
How to change it later? Just run the same command again with the new value:
# Change your name
$ git config --global user.name "New Name"

# See all your current global settings
$ git config --global --list

# Remove a setting entirely
$ git config --global --unset user.name
Why do you need to provide your email? Git attaches your name and email to every commit as metadata. This is how collaborators know who made each change. GitHub also uses the email to link commits to your profile — if the email matches your GitHub account, your avatar and contribution graph update automatically.
When might you NOT want to use your real email? If your repository is public, your email is visible in the commit history. GitHub offers a private "noreply" email address (like 12345+username@users.noreply.github.com) that you can use instead. Find it at GitHub → Settings → Emails → "Keep my email addresses private." Using this noreply email still links commits to your GitHub profile without exposing your real address.
Step-by-Step: Create a New Repository
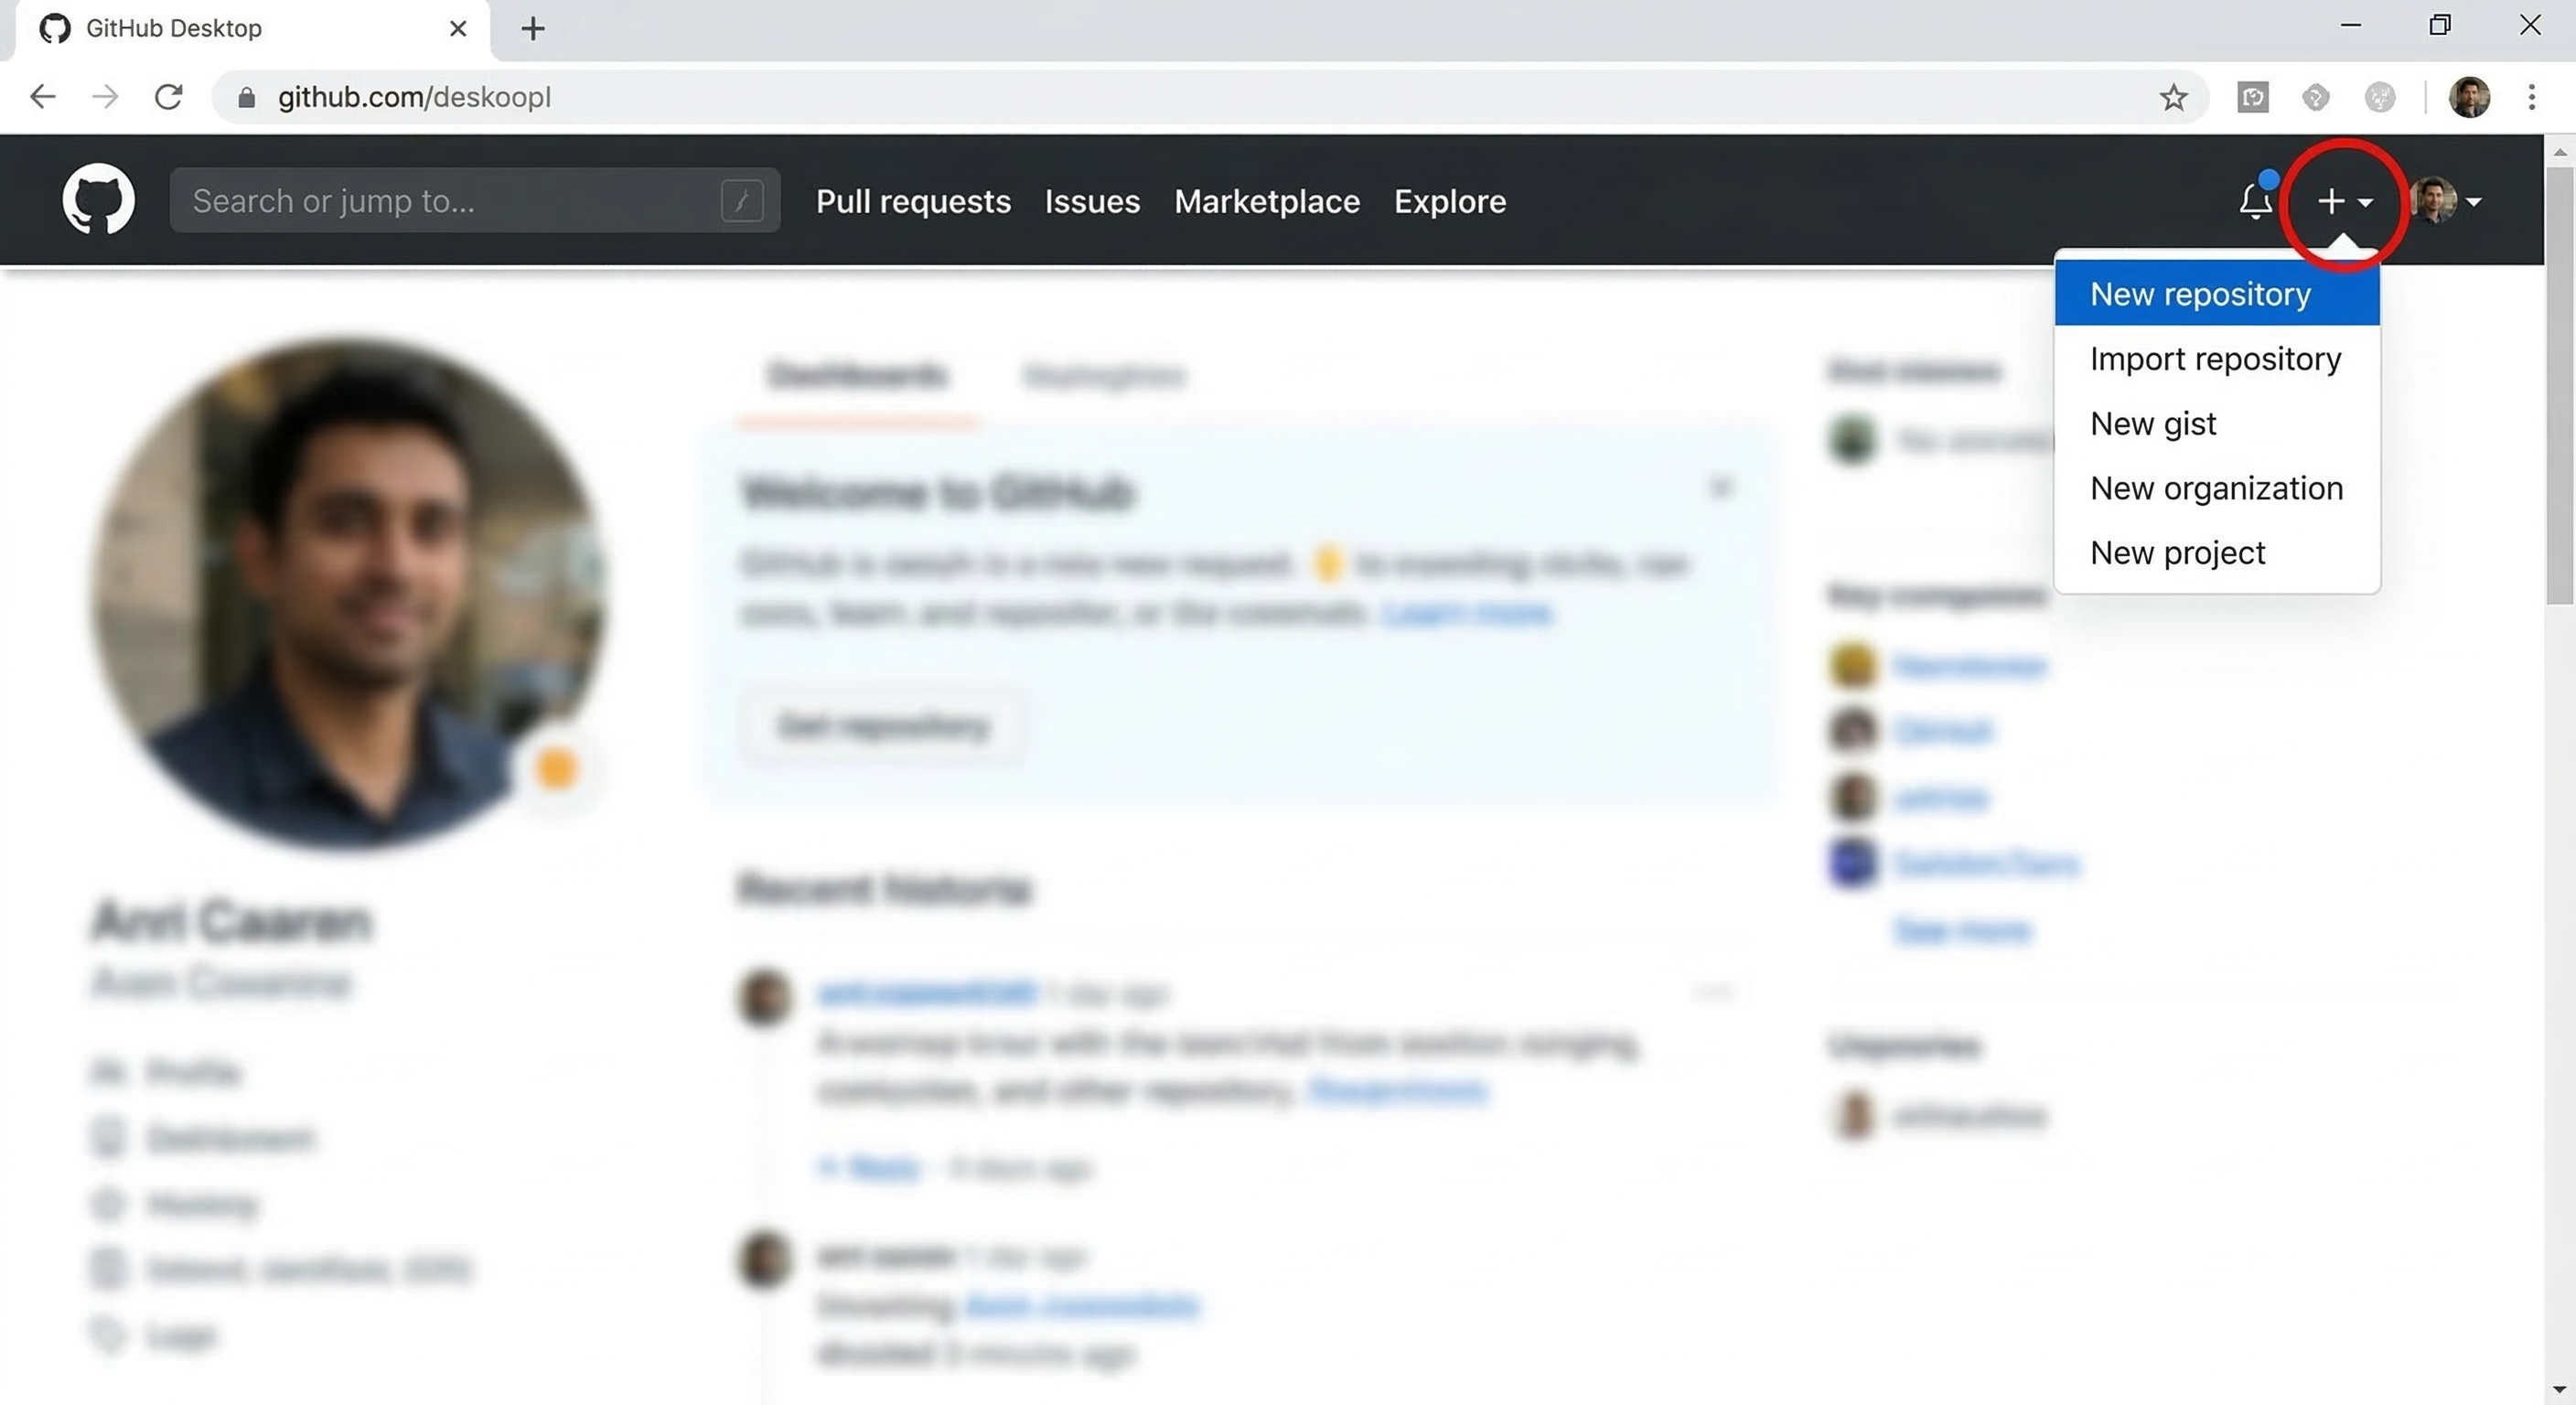
Go to GitHub and click "New Repository"
Click the + icon in the top-right corner of any GitHub page, then select New repository. Or go directly to github.com/new.
Choose a Repository Name
Pick a short, descriptive name using lowercase letters and hyphens:
- Good:
minimum-wage-analysis,did-replication,covid-employment-study - Avoid:
my_stuff,paper1,analysis_v2_final
Add a Description (Optional but Recommended)
Write a one-line summary: "Replication code for Card & Krueger (1994) minimum wage study"
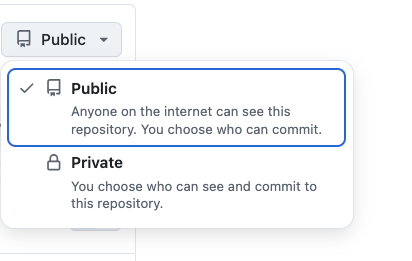
Choose Public or Private
| Public | Private |
|---|---|
| Anyone can see your code | Only you and invited collaborators can see it |
| Good for: published papers, open-source projects, portfolios | Good for: work in progress, sensitive data, proprietary code |
| Free unlimited repositories | Free unlimited repositories (GitHub changed policy in 2019) |
My recommendation: Start private while working, make public when ready to share or publish.
Initialize with README, .gitignore, and License
Check all three boxes. Here is what each does:
README.md: A text file that appears on your repository's main page. It should explain what your project does and how to use it. GitHub renders it beautifully with formatting.
.gitignore: A file that tells Git which files to ignore (not track). Choose a template that matches your main language:
- Python: Ignores
__pycache__/,.env,venv/,*.pyc - R: Ignores
.Rhistory,.RData,.Rproj.user/
License: Specifies how others can use your code. For academic work, I recommend:
- MIT License: Very permissive - anyone can use, modify, and redistribute with attribution
- CC BY 4.0: Good for datasets and non-code content
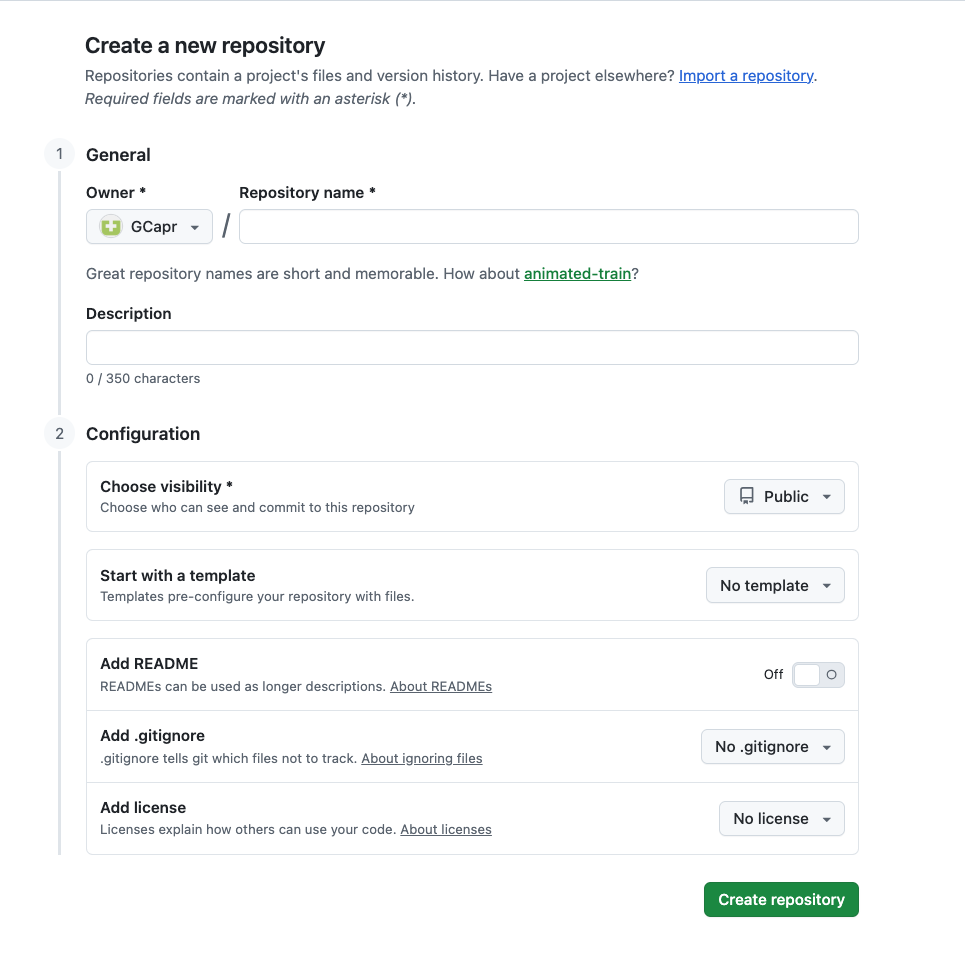
Click "Create Repository"
Your repository is now live! GitHub will show you instructions for connecting it to your local computer.
The green "Create repository" button is at the bottom of the form (visible in the screenshot above).
The complete form is shown in the screenshot above — repository name at the top, visibility toggle, and the initialization checkboxes (README, .gitignore, License) at the bottom.
The .gitignore File Explained
The .gitignore file is crucial for research projects. It tells Git which files should never be tracked. Here is a template for economics research:
# ============================================
# .gitignore for Economics Research Projects
# ============================================

# ----- Data files (often too large or sensitive) -----
data/raw/*.csv
data/raw/*.dta
*.xlsx
*.xlsm
*.zip
*.parquet

# ----- Output (can be regenerated from code) -----
output/figures/*
output/tables/*
*.log

# ----- Python -----
__pycache__/
*.pyc
venv/
.venv/
.ipynb_checkpoints/

# ----- R -----
.Rhistory
.RData
.Rproj.user/

# ----- Stata -----
*.smcl

# ----- Secrets and credentials (NEVER commit these!) -----
.env
*credentials*
*api_key*
*secret*

# ----- OS-generated files -----
.DS_Store
Thumbs.db
Desktop.ini

# ----- IDE and editor files -----
.vscode/
.idea/Once a file is committed to Git, it is in the history forever - even if you delete it later. Be especially careful with:
- API keys and passwords
- Personally identifiable data (PII)
- Proprietary datasets you do not have permission to share
If you accidentally commit sensitive data, you need to purge it from history - simply deleting the file is not enough.
9.5 Cloning a Repository in VS Code
Cloning means downloading a complete copy of a repository from GitHub to your computer. VS Code makes this very easy.
Method 1: Clone via VS Code Interface (Recommended for Beginners)
Open VS Code
If you have a folder already open, you may want to close it first (File > Close Folder) so you start fresh.
Open the Source Control Panel
Click the Source Control icon in the left sidebar (it looks like a branch), or press Ctrl+Shift+G (Windows/Linux) or Cmd+Shift+G (Mac).

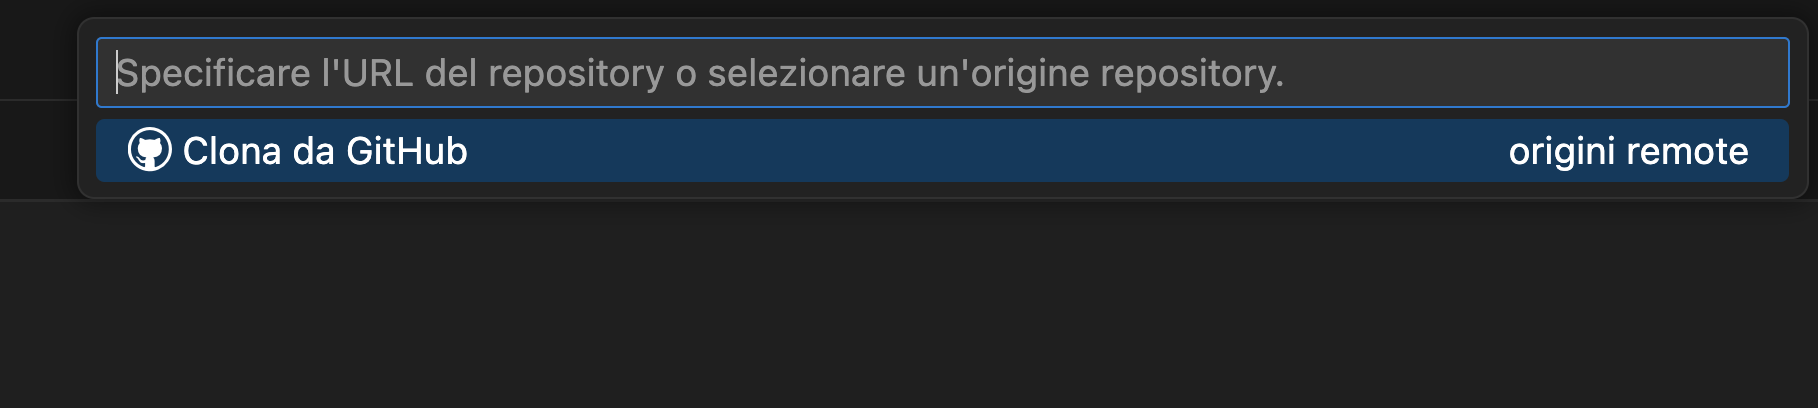
Click "Clone Repository"
You will see a button that says Clone Repository. Click it. If you do not see this button, you can also use the Command Palette (Ctrl+Shift+P / Cmd+Shift+P) and type "Git: Clone".
In the screenshot above, you can see the "Clona repository GIT..." (or "Clone Git Repository..." in English) option in the VS Code welcome screen. You can also find it in the Source Control panel (the branch-like icon in the left sidebar, third from top).
Enter the Repository URL
Go to your GitHub repository, click the green Code button, and copy the HTTPS URL. It looks like:
https://github.com/username/repository-name.gitPaste this URL into VS Code's prompt.
On your repository's GitHub page, look for the green "Code" button near the top-right of the file list. Click it, make sure the HTTPS tab is selected (not SSH), and click the clipboard icon to copy the URL. It will look like https://github.com/username/repository-name.git.
Choose Where to Save It
VS Code will ask where to save the repository on your computer. Pick a logical location like Documents/Projects/ or Documents/Research/.
A standard file browser dialog opens. Navigate to where you want to save the project (for example, Documents/Research/) and click "Select Repository Location" (or "Select as Repository Destination" depending on your OS).
Open the Repository
After cloning, VS Code will ask if you want to open the repository. Click Open.
After cloning finishes, a small notification appears in the bottom-right corner of VS Code asking "Would you like to open the cloned repository?". Click "Open" to load the project in your workspace.
Method 2: Clone via Terminal
If you prefer the command line, or if VS Code's interface is not working:
# Navigate to where you want the project
$ cd ~/Documents/Research

# Clone the repository
$ git clone https://github.com/username/repository-name.git

# Enter the project folder
$ cd repository-name

# Open in VS Code
$ code .What Clone Actually Does
When you clone a repository, Git:
- Creates a new folder with the repository name
- Downloads all the files from the repository
- Downloads the complete history (all previous commits)
- Sets up a connection to the remote repository (called
origin) - Checks out the default branch (usually
main)
You now have a complete, fully-functional copy of the repository that you can work with offline.
VS Code's Git Integration
Once you open a Git repository in VS Code, you will notice several helpful features:
- Source Control panel: Shows changed files and lets you stage, commit, and push with clicks
- File indicators: Modified files show M, new files show U (untracked)
- Branch indicator: Bottom-left corner shows your current branch
- Gutter indicators: Green, red, and blue bars in the editor show added, removed, and modified lines
- GitLens extension: Shows who changed each line and when (if you install this extension)
In VS Code, look for these indicators: M (modified) and U (untracked) badges next to file names in the Explorer sidebar, the current branch name in the bottom-left status bar, and colored bars in the editor gutter (green = new lines, blue = modified lines).
The Source Control panel (Ctrl+Shift+G / Cmd+Shift+G) shows two sections: "Staged Changes" (files ready to commit) and "Changes" (modified but not yet staged). Above them is a text box for your commit message, and a checkmark button to commit.
9.6 The Staging Area Concept
The staging area (also called the "index") is one of Git's most confusing concepts for beginners, but it is also one of its most powerful features.
Imagine you are packing to move to a new apartment. You have boxes scattered around your room (your working directory). Not everything is ready to move - some boxes need more items, others you might throw away.
The staging area is like a "ready to load" zone by your front door. When a box is complete and you are sure you want to move it, you carry it to this zone. Only boxes in this zone will go on the moving truck (your commit).
This lets you move things in organized batches. "All the kitchen stuff goes in one trip" rather than randomly grabbing whatever is closest.
Why Not Just Commit Everything?
You might wonder: "Why not just commit all changed files automatically?" The staging area gives you precise control:
- Separate unrelated changes: You fixed a bug AND reformatted some code. Commit them separately with different messages.
- Partial file staging: You can stage just some changes in a file, not all of them.
- Review before committing: See exactly what you are about to commit before making it permanent.
- Clean history: Each commit does one thing, making it easier to find and fix issues later.
Staging Commands
# Check current status (always do this first!)
$ git status

# Stage a specific file
$ git add analysis.py

# Stage multiple specific files
$ git add analysis.py utils.py data_cleaning.py

# Stage all files in a folder
$ git add code/

# Stage ALL changed files (use carefully!)
$ git add .

# See what's staged vs. unstaged
$ git status

# See the actual staged changes (what will be committed)
$ git diff --staged

# Unstage a file (keep the changes, just don't commit them yet)
$ git restore --staged analysis.pygit add <file> | Stage a specific file. You can list multiple files separated by spaces |
git add . | The . (dot) means "current directory." This stages all changed files — use with caution |
git diff | Shows unstaged changes (what you have edited but not yet staged) |
--staged | When used with git diff, shows only the changes that are staged (i.e., what will go into the next commit) |
git restore --staged <file> | Removes a file from the staging area. Your edits remain in the working directory — nothing is lost |
Staging in VS Code
VS Code makes staging visual and intuitive:
- Open the Source Control panel (click the branch icon or
Ctrl+Shift+G) - You will see a list of Changes - these are modified but unstaged files
- Hover over a file and click the + icon to stage it
- The file moves to the Staged Changes section
- To unstage, hover and click the - icon
To stage a file in VS Code, hover over its name in the Source Control panel's "Changes" section and click the + (plus) icon that appears. To unstage, hover over the file in "Staged Changes" and click the − (minus) icon.
In VS Code, you can stage individual lines within a file. Click on a file in the Source Control panel to see the diff, then right-click on specific changes and select "Stage Selected Ranges."
9.7 Committing Code: What Happens at Each Step
A commit is a permanent snapshot of your staged changes. Let us understand exactly what happens when you commit.
The Commit Process
When you run git commit:
- Git takes a snapshot of all staged changes
- Creates a unique identifier (the commit hash, like
a7b3c9d) - Records metadata: your name, email, timestamp, and commit message
- Links to the previous commit (creating the history chain)
- Clears the staging area (but your working directory stays the same)
Writing Good Commit Messages
Commit messages are crucial. Six months from now, you (or a collaborator) will need to understand what each change did and why.
fixed stuffasdfupdatesWIPchanges
Fix outlier detection to exclude negative valuesAdd robust standard errors to main regressionUpdate data cleaning to handle missing education codesRefactor plotting functions for consistencyAdd Table 3: heterogeneity by region
Commit Message Format
A good commit message follows this structure:
# Short summary (50 characters or less)
Add regression discontinuity analysis

# Blank line, then optional detailed explanation
# Wrap at 72 characters

This implements the RD design from Section 4.2 of the paper.
Uses the rdrobust package with triangular kernel and
MSE-optimal bandwidth selection.

Closes #12
Key principles:
- Use imperative mood: "Add feature" not "Added feature" or "Adds feature"
- Keep the first line under 50 characters (it is shown in many Git interfaces)
- Explain why, not just what (the code shows what)
- Reference issue numbers if applicable (
#12links to GitHub issue 12)
Making a Commit
# First, stage your changes
$ git add analysis.py output/table1.tex

# Commit with a message (short form)
$ git commit -m "Add baseline regression results to Table 1"

# Or open your editor for a longer message
$ git commit
# (Your editor opens, write your message, save and close)

# Shortcut: stage all tracked files AND commit in one step
$ git commit -am "Fix typo in variable name"git commit -m "..." | -m = message. Lets you write the commit message inline. Without it, Git opens a text editor |
git commit -am "..." | -a = all. Stages all modified tracked files automatically (but not new/untracked files). Combined with -m for convenience |
git commit (no flags) | Opens your default text editor so you can write a longer, multi-line commit message |
Viewing Your History
# See commit history
$ git log

# Compact one-line view (very useful!)
$ git log --oneline

# Show last 5 commits with changes
$ git log -p -5

# Visual branch graph
$ git log --oneline --graph --all--oneline | Shows each commit on a single line (just the short hash and message). Much easier to scan than the full output |
-p | Short for patch. Shows the actual code changes (the diff) in each commit |
-5 | Limits output to the last 5 commits. You can use any number |
--graph | Draws an ASCII art graph showing branch and merge history |
--all | Shows commits from all branches, not just the current one |
9.8 Pushing and Pulling Changes
So far, everything we have done has been local - on your computer only. To share your work or back it up, you need to sync with GitHub.
Push: Upload Your Commits
Pushing sends your local commits to the remote repository (GitHub).
# Push your commits to GitHub
$ git push origin main

# If you've set up tracking, you can just use:
$ git push

# First push of a new branch (sets up tracking)
$ git push -u origin mainorigin | The nickname for your remote repository (set automatically when you clone). You can see all remotes with git remote -v |
main | The branch you are pushing. Replace with any branch name as needed |
-u | Short for --set-upstream. Tells Git to remember this remote/branch pair so that next time you can just type git push without specifying the remote and branch |
Pull: Download Changes
Pulling downloads commits from GitHub that you do not have locally. This is how you get work from collaborators or sync between computers.
# Download and merge changes from GitHub
$ git pull origin main

# Or if tracking is set up:
$ git pull

# Check if there are remote changes without downloading
$ git fetch origin
$ git status # Will show if you're behindThe Push/Pull Workflow with Collaborators
This extends the daily cycle introduced in Section 9.3 with the perspective of a collaborator working in parallel:
If you try to push and GitHub rejects it ("failed to push some refs"), it usually means someone else has pushed changes that you do not have. Run git pull first to get their changes, then push.
Handling Merge Conflicts
Sometimes you and a collaborator edit the same lines of the same file. When you pull, Git cannot automatically combine the changes - this is a merge conflict.
Do not panic! Here is how to resolve it:
- Git marks the conflict in the file with special markers:
def calculate_income(df):
<<<<<<< HEAD
    # Your version
    return df['wage'] + df['bonus']
=======
    # Collaborator's version
    return df['salary'] + df['bonus']
>>>>>>> origin/main- Edit the file to keep the version you want (or combine them):
def calculate_income(df):
    # Combined version - using 'salary' column with bonus
return df['salary'] + df['bonus']- Remove the conflict markers (
<<<<<<<,=======,>>>>>>>) - Stage and commit the resolved file:
$ git add analysis.py
$ git commit -m "Resolve merge conflict in income calculation"
VS Code highlights merge conflicts and provides clickable buttons: "Accept Current Change", "Accept Incoming Change", "Accept Both Changes", or "Compare Changes". Much easier than editing the markers manually!
9.9 Common Beginner Mistakes and How to Avoid Them
Everyone makes mistakes when learning Git. Here are the most common ones and how to fix (or avoid) them.
Mistake 1: Committing Sensitive Data
You accidentally commit a file with API keys, passwords, or personal data. Even if you delete it in the next commit, it is still in the history.
Prevention: Set up your .gitignore file from the start (see the template in Section 9.4) and always review staged changes with git diff --staged before committing.
If you already committed: You need to purge it from history using git filter-branch or the BFG Repo-Cleaner. Consider the data compromised — rotate any API keys immediately.
Mistake 2: Working on the Wrong Branch
You made changes directly on main when you meant to create a feature branch, or you are on the wrong branch entirely.
Prevention: Always check git status before starting work. The first line shows your current branch.
If you have uncommitted changes:
# Stash your changes temporarily
git stash

# Switch to (or create) the correct branch
git checkout -b correct-branch

# Apply your stashed changes
git stash pop
If you already committed: You can move commits between branches, but it is more complex. Ask for help or search "git move commits to another branch."
Mistake 3: Committing Large Data Files
You commit a 500MB dataset. Now your repository is huge, slow to clone, and might exceed GitHub's size limits.
Prevention: Add data file extensions to .gitignore: *.csv, *.dta, *.xlsx, *.parquet
For legitimate large files: Use Git LFS (Large File Storage) which stores large files separately.
Best practice: Store data elsewhere (Dropbox, S3, Dataverse) and include a script that downloads it, or include only small sample data in the repo.
Mistake 4: Vague Commit Messages
Your commit history looks like: update, fix, changes, asdf. Six months later, you cannot find when you fixed that bug.
See Section 9.7 for detailed guidance. The key rule: use imperative mood and be specific about what changed and why.
Mistake 5: Not Pulling Before Pushing
You try to push and get rejected: error: failed to push some refs. Your collaborator pushed changes you do not have.
Run git pull origin main first, resolve any conflicts if needed (see Section 9.8), then push again. Best practice: always pull at the start of your work session.
Mistake 6: Panic-Deleting the .git Folder
Something went wrong, Git is confusing, so you delete the .git folder to "start fresh." You just lost all your history.
Never delete .git unless you truly want to lose all history
If confused, ask for help: Almost everything in Git is recoverable if you do not delete .git
If you already pushed to GitHub: You can clone again to get the history back (but you will lose any unpushed local commits)
Mistake 7: Using git add . Without Checking
You run git add . and accidentally stage files you did not mean to: temporary files, large data, credentials.
Before staging: Always run git status to see what will be staged
Use specific file names: git add analysis.py utils.py instead of git add .
After staging: Run git status again to verify. Unstage with git restore --staged filename
Quick Recovery Commands
# Unstage a file (keep changes, just don't commit yet)
$ git restore --staged filename.py

# Discard changes to a file (WARNING: loses your edits!)
$ git restore filename.py

# Undo the last commit but keep changes staged
$ git reset --soft HEAD~1

# Undo the last commit, unstage changes but keep edits
$ git reset HEAD~1

# Undo the last commit AND discard all changes (DANGEROUS!)
$ git reset --hard HEAD~1

# See what you can recover (reflog saves you!)
$ git reflog--staged | Tells git restore to act on the staging area (not the working directory). Without it, restore discards your edits entirely |
--soft | The gentlest reset: moves HEAD back but keeps your changes staged, ready to recommit |
--hard | The most aggressive reset: moves HEAD back and deletes all changes. Use with extreme caution |
HEAD~1 | HEAD is the current commit. ~1 means "one commit before HEAD." ~2 would mean two commits back, and so on |
If you have not run git reset --hard or deleted the .git folder, your changes are almost certainly recoverable. Stop, take a breath, and search for help before doing anything destructive.
9.10 Environment Variables, .env Files, and GitHub Secrets
As your projects grow, you will encounter situations where your code needs sensitive information — API keys, database passwords, or file paths that differ between machines. Hardcoding these values into your scripts is a security risk and makes collaboration harder. The standard solution is a .env file.
What is a .env File?
A .env file is a plain text file named exactly .env (note the dot — it is a hidden file) that stores configuration values your code needs but that should not be in your source code. It sits in your project's root directory and contains simple key-value pairs:
API_KEY=sk-abc123xyz
DATABASE_URL=postgresql://user:pass@localhost/mydb
DATA_PATH=/Users/giulia/data/raw/
How to Create a .env File
Create a file literally named .env in your project root (no file extension):
- In VS Code: File → New File, then name it
.env - In terminal (Mac/Linux):
touch .env - In terminal (Windows):
echo. > .env
Files starting with a dot are hidden by default on Mac and Linux — they will not show up in Finder or when you run ls unless you use ls -a. This is a Unix convention for configuration files. In VS Code, hidden files appear normally in the sidebar, so you can always find and edit your .env there.
How Your Code Reads .env Variables
# First install the package: pip install python-dotenv
from dotenv import load_dotenv
import os

# Load variables from .env into the environment
load_dotenv()

# Access a variable
api_key = os.getenv("API_KEY")
data_path = os.getenv("DATA_PATH")
# Install the package: install.packages("dotenv")
library(dotenv)
# Load variables from .env into the environment
load_dot_env()
# Access a variable
api_key <- Sys.getenv("API_KEY")
data_path <- Sys.getenv("DATA_PATH")* Stata does not have native .env support.
* Instead, create a config.do file in your project root:
* --- config.do ---
global data_path "/Users/giulia/data/raw/"
global api_key "sk-abc123xyz"
* --- In your analysis script ---
do "config.do"
use "${data_path}survey_data.dta", clear
ALWAYS add .env (and config.do for Stata) to your .gitignore file. If you commit a .env file with API keys to a public repository, those keys are compromised — anyone can see them in your commit history, even if you delete the file later.
# Add this line to your .gitignore file
.env
config.do
A common practice is to create a .env.example file (which is committed) showing the variable names without real values, so collaborators know which variables they need to set up:
# Copy this file to .env and fill in your values
API_KEY=your_api_key_here
DATABASE_URL=your_database_url_here
DATA_PATH=/path/to/your/local/data/
GitHub Secrets (for GitHub Actions)
If you use GitHub Actions (automated workflows that run in the cloud), you may need API keys or credentials there too. You cannot use a .env file because it is not committed to your repo. Instead, GitHub provides Secrets — encrypted values stored securely on GitHub's servers.
How to Set a GitHub Secret
Go to your repository on GitHub → Settings → Secrets and variables → Actions → New repository secret. Give it a name (e.g., MY_API_KEY) and paste the value.
How to Use a Secret in a Workflow
In your GitHub Actions workflow file (.github/workflows/your-workflow.yml), access secrets with the ${{ secrets.NAME }} syntax:
# Inside a GitHub Actions workflow file
env:
  API_KEY: ${{ secrets.MY_API_KEY }}
GitHub automatically masks secret values in workflow logs. Even if your script accidentally prints the value, GitHub replaces it with *** in the output. This makes secrets safe for use in automated pipelines.
9.11 Essential Git Commands Summary
Here is a quick reference of the commands covered in this module. Print this out or bookmark it!
Setup and Configuration
| Command | What it does |
|---|---|
git config --global user.name "Your Name" |
Set your name for commits |
git config --global user.email "you@email.com" |
Set your email for commits |
git init |
Initialize a new repository in the current folder |
git clone <url> |
Download a repository from GitHub |
Daily Workflow
| Command | What it does |
|---|---|
git status |
Show the current state of your repository |
git diff |
Show unstaged changes line-by-line |
git diff --staged |
Show staged changes (what will be committed) |
git add <file> |
Stage a file for commit |
git add . |
Stage all changed files |
git commit -m "message" |
Commit staged changes with a message |
git log --oneline |
View commit history (compact) |
Syncing with GitHub
| Command | What it does |
|---|---|
git push origin main |
Upload commits to GitHub |
git pull origin main |
Download commits from GitHub |
git fetch origin |
Check for remote changes (without merging) |
Branching
| Command | What it does |
|---|---|
git branch |
List all local branches |
git checkout -b <name> |
Create and switch to a new branch |
git checkout <name> |
Switch to an existing branch |
git merge <branch> |
Merge a branch into your current branch |
git branch -d <name> |
Delete a branch (after merging) |
Undoing Things
| Command | What it does |
|---|---|
git restore --staged <file> |
Unstage a file (keep changes) |
git restore <file> |
Discard changes to a file (WARNING: loses edits!) |
git reset --soft HEAD~1 |
Undo last commit, keep changes staged |
git reset HEAD~1 |
Undo last commit, unstage changes |
9.12 Further Resources
Interactive Tutorials
- Learn Git Branching - Visual, interactive tutorial for understanding branches
- Oh My Git! - A game for learning Git
- Git Immersion - Guided tour through Git fundamentals
Documentation
- Pro Git Book - The definitive free Git book (Chapters 1-3 are essential)
- GitHub Docs: Getting Started - Official GitHub documentation
- Git Cheat Sheet (PDF) - Printable reference from GitHub
For Economists and Researchers
- Git for Data Scientists - Git workflows tailored for data work
- AEA Data and Code Availability Policy - Journal requirements for code
- Gentzkow, M., & Shapiro, J. M. (2014). Code and Data for the Social Sciences - Best practices guide
Video Tutorials
- Git and GitHub for Beginners (freeCodeCamp, ~60 min)
- Git Tutorial for Beginners (Traversy Media, ~30 min)
The best way to learn Git is to use it. Create a test repository, make changes, break things, and fix them. The more you practice, the more natural it becomes. Within a few weeks of regular use, these commands will become second nature.